When you’re working on macOS, it’s pretty common to install newer Ruby versions using Homebrew. You might need them for specific language features or to ensure your projects run smoothly.
However, a hiccup many of us encounter is that even after a successful Homebrew installation (say, you ran brew install ruby), your Mac might stubbornly stick to its pre-installed Ruby version. This system Ruby is usually lurking at /usr/bin/ruby.
This can be a real pain because it stops you from using the cool new features of the Ruby version you just installed. It can also lead to headaches with tools like Jekyll or when you’re trying to install gems that need a particular Ruby version.
In this guide, I’ll walk you through why this happens and share some effective, real-world strategies to make sure your Homebrew-installed Ruby takes center stage in your shell. We’ll focus on common configuration practices for setting your preferred Ruby on Mac.
Getting to the Bottom of It: The PATH Environment Variable
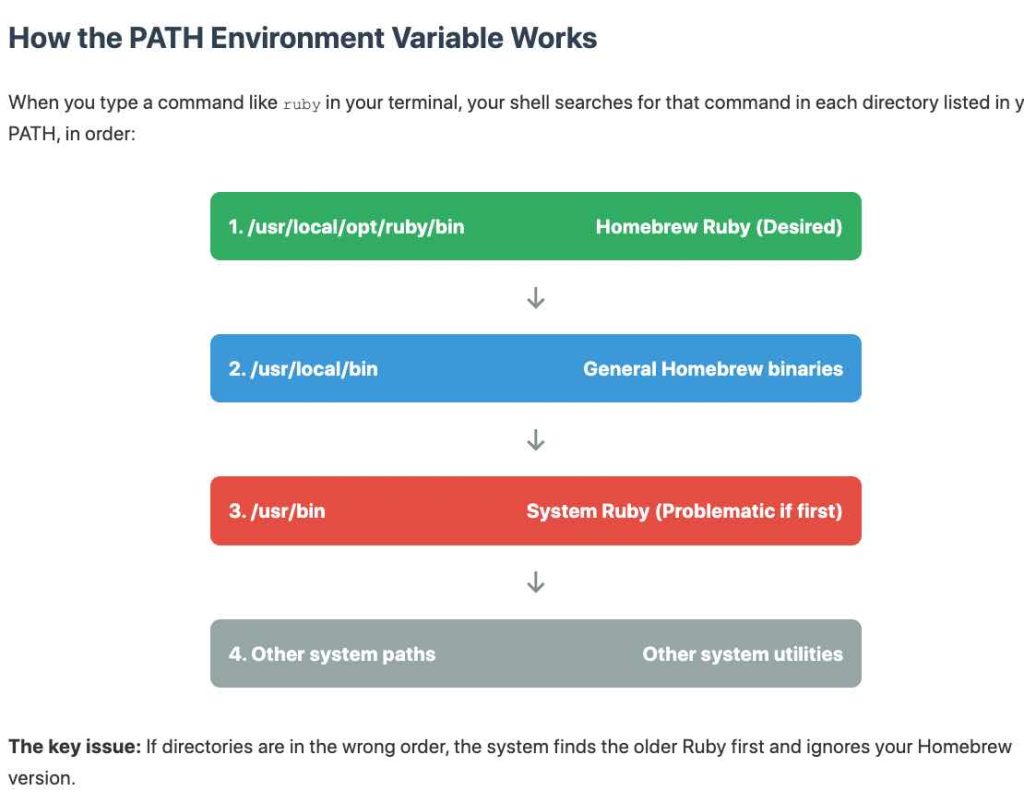
The main reason your system might ignore your new Homebrew Ruby boils down to how your command-line shell (like Terminal) finds programs. This whole process is managed by something called the PATH environment variable.
- Think of the
PATHvariable as a list of signposts, pointing to different directories on your system. These directory paths are separated by colons. - When you type a command, for instance,
ruby, your shell diligently checks these directories one by one, in the exact order they appear in thePATH. - The moment it finds a program named
rubyin one of those directories, it stops looking and uses that one.
By default, macOS includes /usr/bin (where the system’s own Ruby lives) in its PATH. Homebrew, on the other hand, typically places its programs (or links to them, called symlinks) in /usr/local/bin. So, if /usr/bin comes before /usr/local/bin in your PATH, your shell will find the system Ruby first and never even get to the Homebrew one.
What’s more, Homebrew sometimes flags certain software as “keg-only.” This means it won’t automatically create that handy symlink in /usr/local/bin. This often happens when macOS already provides its own version of that software (Ruby is a classic example). In these keg-only situations, even if /usr/local/bin is listed first in your PATH, the Homebrew Ruby executable isn’t directly there, so you’ll need a bit more configuration.
Read: How to Fix `dyld: Library not loaded: icu4c` Errors on macOS After Homebrew Operations
Strategies to Make Homebrew Ruby Your Default
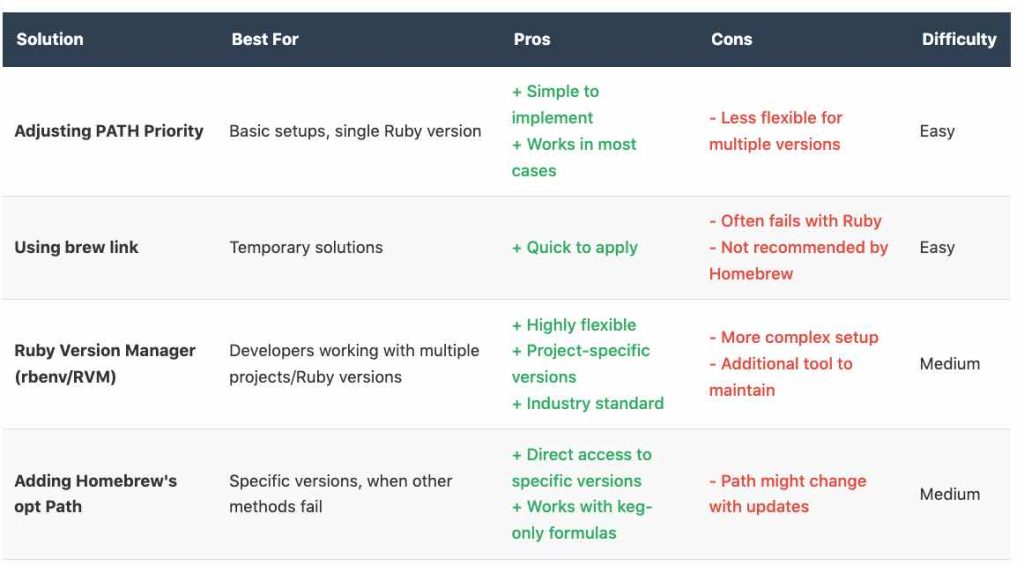
Don’t worry, there are several ways to tackle this. We’ll explore a few, from directly tweaking your PATH to using handy version managers. These are solutions for developers looking for a reliable Ruby setup on macOS.
Solution 1: Adjusting PATH Priority in Your Shell Profile
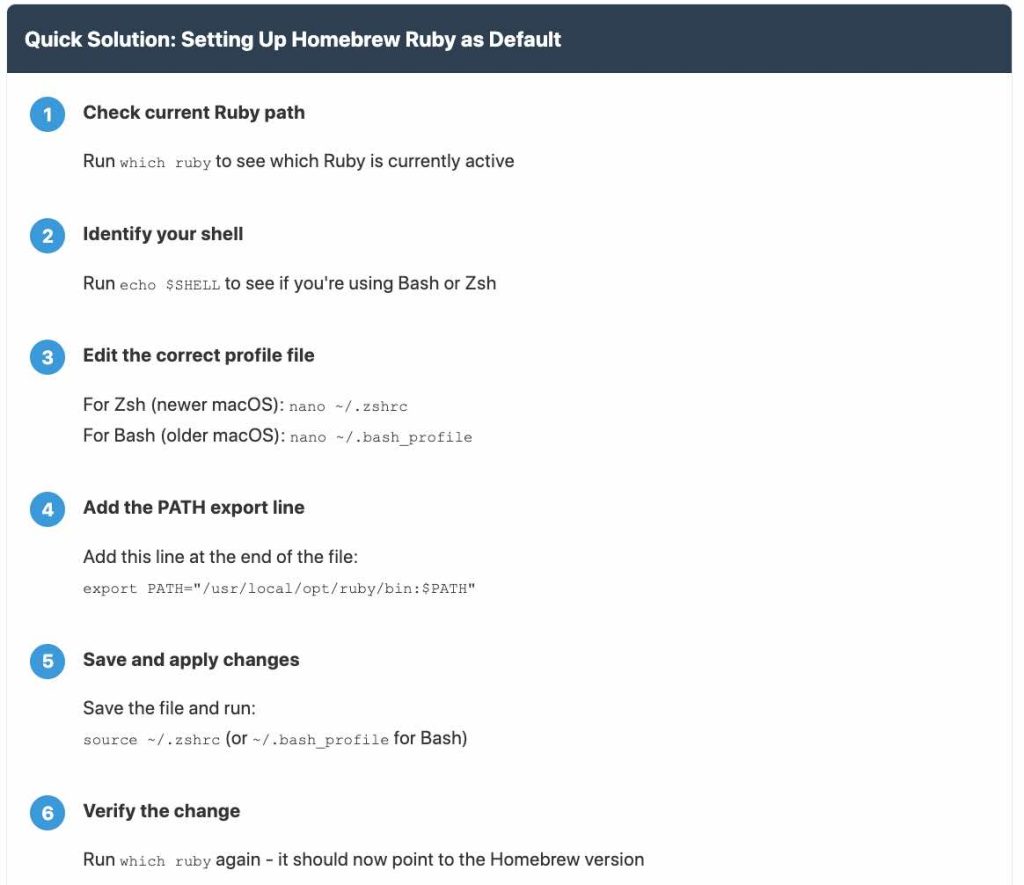
This popular method involves making sure the directory where Homebrew keeps its programs is checked before the system directories. You’ll do this by editing your shell’s startup file (its profile).
- Figure out your shell and its profile file: First, find out which shell you’re using. Open your Terminal and type:
echo $SHELL- If you see
/bin/zsh(this is common on newer macOS versions), you’ll most likely be editing the~/.zshrcfile. - If it shows
/bin/bash(typical for older macOS setups), then~/.bash_profileis your target (or~/.profileif~/.bash_profiledoesn’t exist).
- If you see
- Edit the profile file: Now, add the following line to the very end of the correct profile file. If the file doesn’t exist, this command will create it. This line tells your shell to look in Homebrew’s main binary directory first.
export PATH="/usr/local/bin:$PATH"Alternatively, if you want to be more specific and target the path where Homebrew actually installs Ruby (especially useful if it’s keg-only), you can use the path Homebrew suggests (see Solution 4) or a more dynamic method:
# For Zsh users (recommended for current macOS):
echo 'export PATH="/usr/local/opt/ruby/bin:$PATH"' >> ~/.zshrc

# Or, if you're using Bash:
echo 'export PATH="/usr/local/opt/ruby/bin:$PATH"' >> ~/.bash_profile

# A potentially more robust way, using brew --prefix:
# This dynamically finds the Ruby path managed by Homebrew.
# Make sure to replace .your_profile_file with ~/.zshrc or ~/.bash_profile
# echo 'export PATH="$(brew --prefix ruby)/bin:$PATH"' >> ~/.your_profile_file
Friendly tip: Some developers also suggest adding this export line to
~/.zshenvif you’re using Zsh. It’s another valid spot. - Apply the changes: For these changes to take effect, you can either close your terminal window/tab and open a new one, or simply run:
source ~/.zshrc # Or use source ~/.bash_profile if you edited that one
This approach directly tells your shell, “Hey, check Homebrew’s main spot for programs before looking anywhere else.”
Solution 2: Using `brew link` (If It’s an Option)
Homebrew uses a system called “linking” to create shortcuts (symlinks) from its specific installation directories (like /usr/local/opt/ruby) to the general Homebrew program directory (/usr/local/bin). If Ruby was installed but not linked (perhaps it was marked “keg-only”), you can try to tell Homebrew to create this link.
- Try linking Ruby:
brew link --overwrite ruby - If that doesn’t work, you might need to be more forceful: Sometimes, you might need to add the
--forceflag. Use this with a bit of caution, as it overrides Homebrew’s safeguards.brew link --overwrite ruby --force - Refresh your shell: Just like before, either restart your terminal or source your profile file.
A word of caution: Homebrew might deliberately refuse to link software like Ruby if macOS already provides it. You’ll usually see a warning like Warning: Refusing to link macOS provided/shadowed software: ruby. If this happens, don’t fight it! Modifying your PATH (as in Solution 1 or Solution 4) is the way to go, and it’s what Homebrew itself usually recommends in its “caveats” (notes after installation).
Read: How to kill and Find processes listening to port 3000 on Mac
Solution 3: Leveraging a Ruby Version Manager (like rbenv)
If you’re a developer juggling multiple Ruby projects, and especially if those projects need different Ruby versions, I can’t recommend a dedicated version manager enough. Tools like rbenv or RVM are lifesavers. They let you install and switch between multiple Ruby versions effortlessly. This is a key strategy for “managing multiple Ruby versions on macOS”.

Here’s how you might use rbenv (which you can install via Homebrew):
- Install rbenv and its helper, ruby-build:
brew update brew install rbenv ruby-build - Install the Ruby version you need: (Just swap out `3.1.2` with the version number you’re after)
rbenv install 3.1.2 - Set this version as your global default:
rbenv global 3.1.2 - Integrate rbenv with your shell: You need to make sure rbenv’s initialization command is added to your shell profile (
~/.zshrcfor Zsh, or~/.bash_profilefor Bash). The best way is to follow the instructions you get from `brew info rbenv` or by checking the rbenv documentation. It usually involves adding a line similar toeval "$(rbenv init -)". For Zsh, it’s often:echo 'eval "$(rbenv init - zsh)"' >> ~/.zshrcFor Bash, it might be:
echo 'eval "$(rbenv init - bash)"' >> ~/.bash_profile - Refresh your shell: You guessed it – restart your terminal or source your profile.
Version managers are pretty smart; they handle the PATH adjustments behind the scenes using “shims.” This provides a much cleaner and more flexible way to manage different Ruby environments.
![]()
Read: How to Install pip on macOS
Solution 4: Directly Adding Homebrew’s `opt` Path
When Homebrew installs something as “keg-only” (meaning it’s not linked into /usr/local/bin), it usually gives you specific instructions (these are called “caveats”) on how to add its dedicated installation path to your environment. This path is typically found within /usr/local/opt/. This is a robust way to “force macOS to use Homebrew Ruby keg”.
- Locate the correct path: Homebrew generally installs Ruby versions (even specific ones) under the
/usr/local/opt/directory. The generic path might be/usr/local/opt/ruby/bin. If you installed a specific version like `ruby@3.1`, it might be/usr/local/opt/ruby@3.1/bin. You can usually find this information in the output frombrew info rubyor messages shown when you install/reinstall Ruby. - Add this path to your shell profile: Much like in Solution 1, you’ll add an export command to your
~/.zshrc(for Zsh) or~/.bash_profile(for Bash):# Example for the generic Ruby path (adjust if you're using a versioned formula) echo 'export PATH="/usr/local/opt/ruby/bin:$PATH"' >> ~/.zshrc # Example if you installed a specific version like ruby@3.1 # echo 'export PATH="/usr/local/opt/ruby@3.1/bin:$PATH"' >> ~/.zshrcAs I mentioned earlier,
~/.zshenvis also a perfectly fine place for these kinds of exports in Zsh environments. - Reload your shell: Restart your terminal or run
source ~/.your_profile_file.
This method directly tells your shell to prioritize the specific Homebrew Ruby installation path, neatly sidestepping any need for linking into /usr/local/bin.
Confirming Your Setup
After you’ve applied one of these solutions and reloaded your shell configuration, it’s time to make sure everything’s working as expected. Here’s how to “verify default Ruby version macOS”:
- Check which Ruby is active:
which rubyThe output here should now point to a path inside
/usr/local/(like/usr/local/bin/rubyor/usr/local/opt/ruby/bin/ruby). If you used a version manager, it might show a path involving.rbenv/shims. Crucially, it should not show/usr/bin/ruby. - Check the Ruby version:
ruby -vThis should display the version number of the Ruby you installed via Homebrew or your chosen version manager.
- List all Ruby executables found in PATH (optional but informative):
which -a rubyThis command shows all occurrences of the
rubyprogram that your shell can find by looking through the directories in yourPATH. They’ll be listed in order of preference, so your desired Homebrew or version manager path should be at the top.
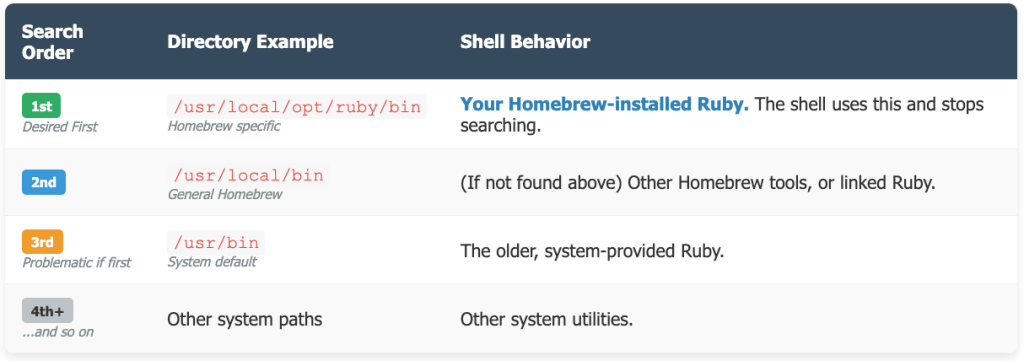
Here’s a simplified look at how the PATH variable works:
Heads-Up: Common Hurdles and Things to Keep in Mind
- System Ruby and Gem Permissions: A very common reason to avoid the system Ruby (
/usr/bin/ruby) is trouble with installing gems. You’ll often see permission errors likeGem::FilePermissionError. This happens because the default system gem directory (e.g.,/Library/Ruby/Gems/...) needs admin rights (sudo) to be modified.
When you use your Homebrew-installed Ruby or a version manager, gems are typically installed into directories your user account can write to, which sidesteps this whole “gem install permission denied macOS” issue. This alone is a huge reason to get your Homebrew Ruby set up as default! - Homebrew Link Failures: Just a reminder –
brew linkmight be intentionally blocked for Ruby. Always check Homebrew’s output for warnings. If linking is a no-go, the PATH modification methods are your best friends. - Compiler and Linker Flags for Gems: Sometimes, when you’re installing gems that need to compile native extensions (bits of C code), you might need to give the compiler a little help. Specifically, you need to tell it where to find the header files and libraries for your Homebrew Ruby. Homebrew’s caveats often suggest setting environment variables like these:
export LDFLAGS="-L/usr/local/opt/ruby/lib"
export CPPFLAGS="-I/usr/local/opt/ruby/include"
(Remember to adjust the path if you’re using a version-specific formula like
ruby@3.1). Similarly,pkg-config(a helper tool for finding compiler flags) might need a nudge:export PKG_CONFIG_PATH="/usr/local/opt/ruby/lib/pkgconfig"These should also find a home in your shell profile file (like
~/.zshrc,~/.bash_profile, or even~/.zshenv). - Shell Reload is Key: Any changes you make to your shell profile files won’t magically apply to your current terminal session. They only kick in for new shell sessions OR if you manually tell your current session to re-read the configuration using
source ~/.your_profile_file. Restarting your terminal application (Cmd+Q and then reopen) is also a surefire way to get the new settings.
Wrapping It Up
Making sure your macOS system uses the Homebrew-installed Ruby version instead of the one Apple provides mostly comes down to getting the order of directories right in your PATH environment variable. You can achieve this by directly tweaking the PATH in your shell’s profile (~/.zshrc or ~/.bash_profile), by using Homebrew’s specific opt path for Ruby, or by embracing a dedicated Ruby version manager like rbenv.
While brew link is a command, Homebrew might intentionally stop it from working with Ruby. Getting your PATH configured correctly means your shell finds the Ruby version you want first, which helps resolve version conflicts and generally makes your development life a lot smoother. This is essential for a stable Ruby development environment on Mac.


