A common convenience for developers using Visual Studio Code (VS Code) on macOS is launching the editor directly from the terminal using the code . command to open the current directory.
However, sometimes this results in a -bash: code: command not found or similar error message, indicating that the shell cannot locate the code executable.
This situation typically arises after installing VS Code, particularly if certain setup steps weren’t completed or if the application isn’t located in the standard /Applications folder. This article details the reasons behind this error and provides several methods to enable the code command based on common configuration practices.
Why the ‘command not found’ Error Occurs
When you type a command like code into your terminal, the shell (such as Bash or Zsh) searches for an executable file with that name within a specific list of directories. This list is defined by the PATH environment variable. If the directory containing the code executable, or a symbolic link pointing to it, is not included in your shell’s PATH, the shell cannot find the command, leading to the “command not found” error.
Several factors contribute to this:
- Missing PATH Configuration: The VS Code installation process might not have automatically added its command-line launcher location to the system’s or user’s
PATH. - Incorrect VS Code Location: For persistent setup, especially when using VS Code’s built-in command installer, the application itself (
Visual Studio Code.app) should reside in the main/Applicationsfolder. Running it fromDownloadsor other locations can lead to the command failing after a system restart or update. - Shell Session Not Updated: After modifying the
PATH(either manually or via an installer), the current terminal session might not reflect the changes until it’s restarted or the configuration file is reloaded (sourced).
Methods to Enable the ‘code’ Command
Here are various approaches to resolve the issue and enable launching VS Code from the terminal:
Read: How to Upgrade Node.js on macOS
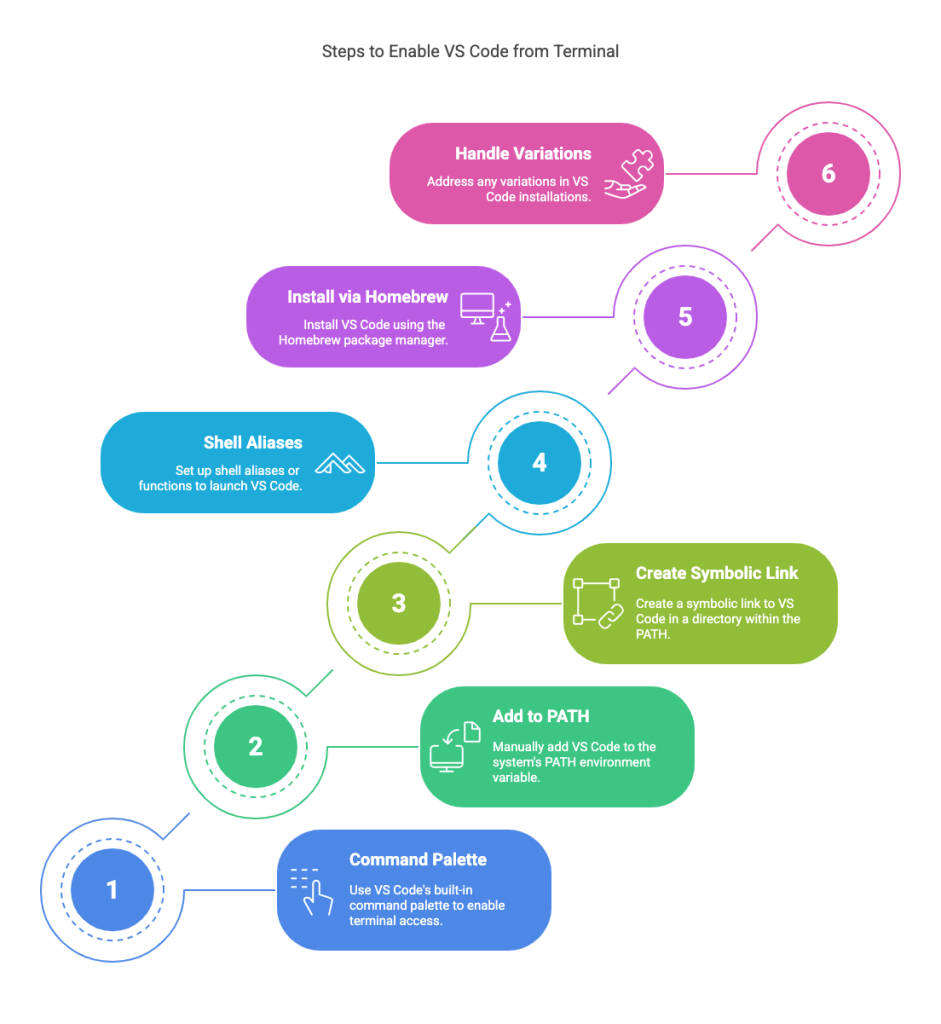
1. Using the VS Code Command Palette (Recommended)
VS Code provides a built-in command to handle this setup automatically. This is generally the preferred method.
- Ensure
Visual Studio Code.apphas been moved to your main/Applicationsfolder. This step is crucial for the setting to persist across restarts. - Open Visual Studio Code.
- Open the Command Palette using the shortcut
⌘⇧P(Cmd+Shift+P). - Type
shell commandinto the palette. - Select the command Shell Command: Install ‘code’ command in PATH and press Enter.
- You should see a success notification: “Shell command ‘code’ successfully installed in PATH.”
- Restart your terminal application (e.g., Terminal, iTerm2) completely. New terminal sessions will now recognize the
codecommand. In some cases, a full system reboot might be mentioned, particularly if VS Code wasn’t initially in/Applications.
Troubleshooting this method:
- If the command doesn’t work after a restart, verify VS Code is in
/Applications. Remove any Dock shortcuts pointing to an old location (e.g., inDownloads). - If you encounter an
EACCES: permission deniederror during installation, first run the Shell Command: Uninstall ‘code’ command in PATH command from the Command Palette, and then immediately run the Install ‘code’ command in PATH command again.
This command typically creates a symbolic link to the actual code executable within a directory that is usually already in the default system PATH, such as /usr/local/bin/.
2. Manually Adding VS Code to the PATH
You can directly modify your shell’s configuration file to include the directory containing the code executable.
- Identify your shell configuration file. Common files are:
- Zsh (default on macOS Catalina 10.15 and later):
~/.zshrc - Bash (older macOS versions):
~/.bash_profileor~/.bashrc
- Zsh (default on macOS Catalina 10.15 and later):
- Open the file in a text editor (e.g., using
vim ~/.zshrcornano ~/.zshrc). - Add the following line at the end of the file, assuming VS Code is in
/Applications:export PATH="$PATH:/Applications/Visual Studio Code.app/Contents/Resources/app/bin"Note: If the application name contains spaces, ensure it’s quoted correctly or spaces are escaped if using certain shell constructs, though the double quotes shown handle this.
- Save the file and exit the editor (e.g., in `vim`, press `Esc` then type `:wq` and Enter).
- Apply the changes to your current terminal session by sourcing the file:
source ~/.zshrc # Or source ~/.bash_profileNew terminal sessions will automatically inherit this updated `PATH`.
This method explicitly tells the shell where to find the VS Code command-line tools.
Read: How to Change the Default Java version on macOS
3. Creating a Symbolic Link Manually
A symbolic link (symlink) acts as a pointer. You can create a symlink named code inside a directory that’s already in your PATH (like /usr/local/bin), pointing it to the actual VS Code executable.
- Open your terminal.
- Execute the following command. You will likely need administrator privileges (`sudo`):
sudo ln -s "/Applications/Visual Studio Code.app/Contents/Resources/app/bin/code" /usr/local/bin/codeThe
-sflag creates a symbolic link. Some variations use-fsto force overwrite if a link already exists, but be cautious with forcing. - Enter your administrator password when prompted.
- Restart your terminal or open a new tab/window.
If /usr/local/bin is in your PATH (which is standard on macOS), the shell will now find the code symlink and execute the target VS Code application binary.
4. Using Shell Aliases or Functions
Instead of modifying the PATH or creating system-wide links, you can define a shortcut directly within your shell’s configuration file.
Alias Method (Zsh/Bash):
Add this line to your ~/.zshrc or ~/.bash_profile:
alias code="/Applications/Visual\ Studio\ Code.app/Contents/Resources/app/bin/code"Note the backslash \ used to escape the space in the path when not using quotes, or use quotes: `alias code=”/Applications/Visual Studio Code.app/Contents/Resources/app/bin/code”`
Function Method (Zsh/Bash):
Some configurations use a function, often leveraging the macOS open command:
code () { VSCODE_CWD="$PWD" open -n -b "com.microsoft.VSCode" --args "$@" ;}Or a simpler version:
code() {
   open -a "Visual Studio Code.app" "$@"
}
Note: Using "$@" is important to correctly handle arguments containing spaces.
After adding an alias or function, reload your shell configuration:
source ~/.zshrc # Or source ~/.bash_profile5. Installing via Homebrew
If you use the Homebrew package manager, installing VS Code via Homebrew Cask often handles the command-line setup automatically.
- Install Homebrew if you haven’t already.
- Install VS Code using the command:
brew install --cask visual-studio-code(Older Homebrew versions used `brew cask install…`)
- Homebrew typically creates the necessary symlink in
/usr/local/bin. Restart your terminal. - If the link seems broken or missing after installation, you can try reinstalling:
brew reinstall --cask visual-studio-code
6. Handling VS Code Variations
Different builds of VS Code use different command names:
- VS Code Insiders: Use
code-insiders . - VSCodium (OSS Build): Use
codium .
The setup methods above generally apply, but you’ll need to adjust the command name and potentially the application path (e.g., Visual Studio Code - Insiders.app) accordingly when manually configuring PATH, symlinks, or aliases.
Verification
After applying one of the solutions and restarting your terminal (or sourcing the config file), you can verify if the code command works:
- Navigate to any directory in your terminal (e.g.,
cd ~/my-project). - Run
code .. VS Code should launch and open the current directory. - Optionally, check where the shell finds the command:
which codeorcommand -v code. This should output the path to the executable or symlink (e.g.,/usr/local/bin/code).
Key Considerations
- Application Location: Keeping
Visual Studio Code.appin the/Applicationsfolder is highly recommended for stability and persistence, especially when using the Command Palette installer. - Restart/Reload: Changes to
PATHin shell configuration files require either restarting the terminal or runningsource ~/.your_config_file. - Permissions: Creating symlinks in system directories like
/usr/local/binusually requiressudo. Errors likeEACCESmight indicate permission issues; the Uninstall/Install method in the Command Palette often resolves these. - Shell Type: Ensure you are editing the correct configuration file for your active shell (
.zshrcfor Zsh,.bash_profilefor Bash). - Build Version: Remember to use
code-insidersorcodiumif you are using those specific builds.
Conclusion
The code: command not found error on macOS stems from the shell’s inability to locate the VS Code executable via its PATH variable. By utilizing the built-in Command Palette installer (the recommended approach), manually configuring the PATH, creating symbolic links, defining shell aliases/functions, or leveraging a Homebrew installation, you can readily enable the convenient code . command for launching Visual Studio Code from your terminal. Ensuring VS Code resides in the /Applications folder is a key step for persistent configurations.


