Developers working on macOS often need to manage multiple Java Development Kit (JDK) installations simultaneously.
This requirement arises when different projects depend on specific Java versions, or when testing applications across various environments. Effectively switching the active, or default, JDK version used by the system and terminal sessions is crucial for a smooth development workflow.
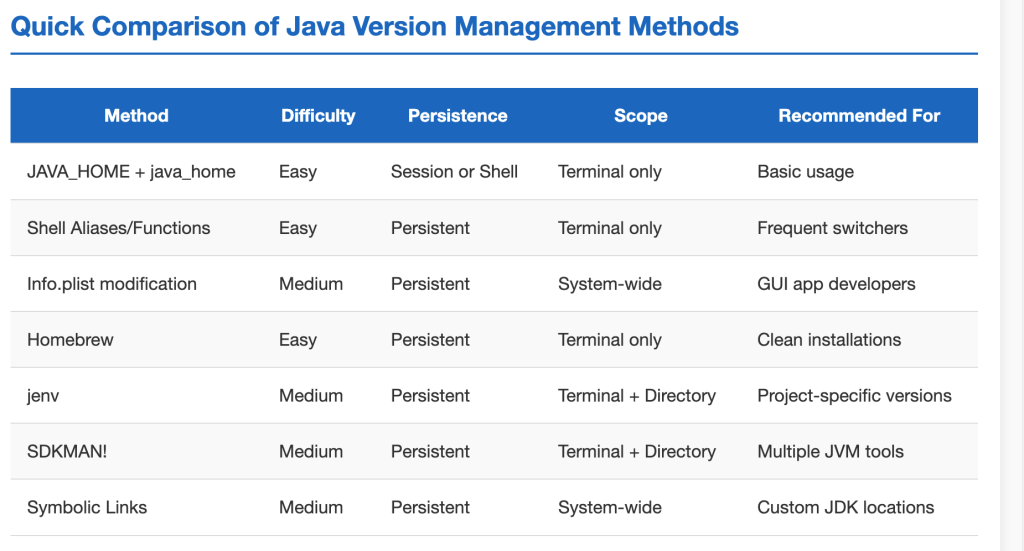
This article outlines the underlying mechanisms and presents several common methods for managing and changing the default Java version on macOS.
Understanding Java Version Selection on macOS
Two primary mechanisms influence which Java version is used:
- The
JAVA_HOMEEnvironment Variable: Many Java-based tools and applications rely on theJAVA_HOMEenvironment variable to locate the necessary JDK installation. This variable typically affects the Java version used within the current terminal session and any processes launched. - System Default Behavior: For applications or processes initiated outside a specific terminal context (like GUI applications launched from Finder or system services), macOS generally selects the JDK with the highest version number found within the standard installation directory,
/Library/Java/JavaVirtualMachines/. This selection process often depends on the presence and contents of anInfo.plistfile within each JDK’s directory structure.
The utility /usr/libexec/java_home plays a vital role. It can list installed JDKs and provide the home directory path for a specific version, which is often used to set JAVA_HOME dynamically.
Read: How to Locate the Java Installation Directory on macOS
Methods for Changing the Java Version
Several approaches exist to control the active Java version, ranging from temporary shell-specific changes to system-wide adjustments.
1. Using `/usr/libexec/java_home` and `JAVA_HOME`
This is a fundamental method for controlling the Java version within a specific terminal session.
- List Installed JDKs: First, identify the available JDK versions and their locations using the
java_homeutility:/usr/libexec/java_home -VThis command outputs a list of installed JVMs, including their version string, architecture, name, and path.
- Set
JAVA_HOMEfor the Current Session: To activate a specific version (e.g., 1.8), use theexportcommand combined with command substitution. Thejava_home -vflag selects the desired version.For Bash or Zsh shells:export JAVA_HOME=$(/usr/libexec/java_home -v 1.8)Note: Some older examples use backticks (
`) for command substitution (export JAVA_HOME=`/usr/libexec/java_home -v 1.8`), but the$(...)syntax is generally preferred.For Fish shell:
set -x JAVA_HOME (/usr/libexec/java_home -v 1.8)This sets the
JAVA_HOMEvariable only for the current terminal session. - Make the Change Persistent for Shell Sessions: To make a specific Java version the default for all new terminal sessions, add the appropriate
exportorset -xcommand to your shell’s startup configuration file. Common files include:- Bash:
~/.bash_profileor~/.bashrc - Zsh:
~/.zshrcor~/.zshenv - Fish:
~/.config/fish/config.fish
For example, add
export JAVA_HOME=$(/usr/libexec/java_home -v 1.8)to your~/.zshrcfile. After editing, reload the configuration:source ~/.zshrc # Or your respective shell config file - Bash:
2. Creating Shell Aliases or Functions
For developers who frequently switch between versions, shell aliases or functions provide convenient shortcuts.
Add definitions like these to your shell configuration file (~/.bash_profile, ~/.zshrc, ~/.config/fish/config.fish):
Example Aliases (Bash/Zsh):
alias j8="export JAVA_HOME=$(/usr/libexec/java_home -v 1.8); java -version"
alias j11="export JAVA_HOME=$(/usr/libexec/java_home -v 11); java -version"
alias j17="export JAVA_HOME=$(/usr/libexec/java_home -v 17); java -version"
# Add aliases for other installed versions (e.g., j9, j10, j12, ...)
Example Function (Bash/Zsh):
jhome () {
  export JAVA_HOME=$(/usr/libexec/java_home -v "$1")
  echo "JAVA_HOME set to: $JAVA_HOME"
  java -version
}

# Usage: jhome 1.8, jhome 11, jhome 17
Example Function (Fish):
function jhome
    set -gx JAVA_HOME (/usr/libexec/java_home -v $argv)
    echo "JAVA_HOME set to: $JAVA_HOME"
    java -version
end
funcsave jhome

# Define aliases for convenience
alias j8 "jhome -v 1.8"
alias j11 "jhome -v 11"
funcsave j8
funcsave j11

# Usage: j8, j11, or jhome -v 17
Remember to reload your shell configuration (e.g., source ~/.zshrc) after adding these. These aliases/functions quickly update JAVA_HOME and often print the active version as confirmation.
3. Controlling the System-Wide Default (macOS El Capitan and newer)
To influence the default JDK chosen by the operating system (affecting GUI apps or services launched outside your configured shell), you can modify the JDK installations themselves.
- Navigate to the standard JDK installation directory:
/Library/Java/JavaVirtualMachines/. - Locate the directory of the JDK version you wish to *exclude* from being the default (e.g.,
jdk-17.jdk). - Inside that directory, rename the
Contents/Info.plistfile to something else, likeContents/Info.plist.disabled.
By renaming this file, you prevent the system’s default selection mechanism from recognizing that specific JDK. The OS will then choose the highest version among the remaining JDKs that *do* have a valid Info.plist file. This JDK can still be explicitly used by setting JAVA_HOME.
4. Managing JDKs with Homebrew
Disclaimer :
The current syntax for installing Java versions uses the temurin cask exclusively. Previous references to AdoptOpenJDK taps and installation commands are now obsolete. To maintain clarity and ensure successful installation, all Homebrew commands should consistently use the current temurin syntax (e.g., brew install --cask temurin@11).
Homebrew is a popular package manager for macOS and can be used to install and manage multiple JDK versions.
- Install Homebrew (if not already installed). Follow instructions on the official Homebrew website.
- Install JDK Versions: Use the
temurincasks (from Eclipse Temurin, formerly AdoptOpenJDK). Ensure you tap the necessary cask repository first.# Tap the versioned casks repository (if needed) brew tap homebrew/cask-versions # Install specific versions (e.g., 8, 11, 17, latest) brew install --cask temurin # Installs the latest LTS brew install --cask temurin@17 brew install --cask temurin@11 brew install --cask temurin@8 # Add other versions as neededNote: Syntax and tap names have changed over time. Previously, commands like `brew cask install adoptopenjdk8` from the `AdoptOpenJDK/openjdk` tap were common but are now deprecated or updated. Always refer to current Homebrew documentation.
- Switch Between Versions: Homebrew installs JDKs in locations typically recognized by
/usr/libexec/java_home. Use theJAVA_HOMEexport method or the alias/function approach described earlier to switch between these installed versions. A common pattern using aliases with explicit variables:# Add to your .bash_profile or .zshrc export JAVA_8_HOME=$(/usr/libexec/java_home -v1.8) export JAVA_11_HOME=$(/usr/libexec/java_home -v11) export JAVA_17_HOME=$(/usr/libexec/java_home -v17) # Add other versions alias java8='export JAVA_HOME=$JAVA_8_HOME; echo "Using Java 8"; java -version' alias java11='export JAVA_HOME=$JAVA_11_HOME; echo "Using Java 11"; java -version' alias java17='export JAVA_HOME=$JAVA_17_HOME; echo "Using Java 17"; java -version' # Optionally set a default on shell startup java11Remember to `source` your configuration file after changes.
5. Using Version Management Tools
Dedicated tools simplify managing multiple SDK versions.
- jenv: A command-line tool specifically for managing Java environments.
- Install via Homebrew:
brew install jenv - Configure your shell according to `jenv` documentation (usually involves adding lines to your shell profile).
- Add installed JDKs:
jenv add /path/to/jdk/Contents/Home(e.g., paths found via/usr/libexec/java_home -Vor Homebrew install locations). - Set versions:
jenv global,jenv local(per directory), orjenv shell(current session). - List versions:
jenv versions.
Note: Some observations suggest `jenv` primarily manages `JAVA_HOME` and might not affect the true system-wide default for all applications (like some IDEs if not launched from a configured shell).
- Install via Homebrew:
- SDKMAN!: A more general tool for managing SDKs for various JVM languages and build tools.
- Install following instructions on the SDKMAN! website.
- List available Java versions:
sdk list java - Install versions:
sdk install java(e.g.,sdk install java 11.0.15-tem) - Switch versions:
sdk use java(current shell) orsdk default java(sets default for future shells). - Supports project-specific versions via
.sdkmanrcfiles.
6. Registering Custom JDK Locations via Symbolic Links
If a JDK is installed in a non-standard location (e.g., bundled with an application like Android Studio), you can make it recognizable by /usr/libexec/java_home by creating a symbolic link within the standard directory.
For example, to register the JRE bundled with Android Studio:
sudo ln -s /Applications/Android\ Studio.app/Contents/jre /Library/Java/JavaVirtualMachines/jdk-android-studio.jdkReplace the source path and the target link name (jdk-android-studio.jdk) as appropriate. After creating the link, /usr/libexec/java_home -V should list the linked JDK, and it can be selected using methods involving java_home -v.
Verification
After applying any of these methods, verify the active Java version:
- Check the command-line version:
java -version - Check the compiler version:
javac -version(requires a full JDK) - Check the
JAVA_HOMEvariable:echo $JAVA_HOME - For build tools like Maven, check their reported Java version:
mvn -version(sometimes useful if `java -version` seems inconsistent in certain contexts).
Potential Issues and Considerations
- Scope: Setting
JAVA_HOMEviaexportorset -xwithout adding it to a startup file only affects the current terminal session. - Shell Configuration: Remember to reload your shell configuration file (
source ~/.your_config_file) after making changes for them to take effect in new sessions. - Shell Differences: Syntax for setting variables (
export VAR=...vsset -x VAR ...) and command substitution ($(...)vs(...)) varies between shells (Bash, Zsh, Fish). Startup file names also differ. - System vs. Shell: Methods relying solely on
JAVA_HOMEmight not change the default Java used by GUI applications launched directly from the macOS Finder or Dock. TheInfo.plistrenaming method targets this system-level default more directly. - Tool Limitations: Version managers like `jenv` might primarily manipulate environment variables, potentially sharing the same limitations regarding the true system-wide default as manual `JAVA_HOME` setting.
- Permissions: Creating symbolic links in system directories like
/Library/Java/JavaVirtualMachines/usually requiressudoprivileges. - Homebrew Updates: Homebrew commands and available packages (taps/casks) change over time. Consult current Homebrew documentation for accuracy.
- JDK vs. JRE: Ensure you have a full JDK (Java Development Kit) installed if you need development tools like the compiler (`javac`), not just a JRE (Java Runtime Environment).
Conclusion
Managing multiple JDK versions on macOS involves understanding the role of the JAVA_HOME environment variable and the system’s default selection mechanism.
Whether you prefer direct manipulation via /usr/libexec/java_home and shell configuration, convenient aliases and functions, system-level adjustments via Info.plist renaming, installation management with Homebrew, or dedicated version managers like `jenv` or SDKMAN!, several effective strategies are available.
Choosing the right method depends on whether you need temporary changes, persistent shell defaults, or control over the system-wide behavior.


